ELT Calendar

Holiday Season ELT Calendar
Taken from dreamstime. Link found  here

It is my favourite time of the year! Christmas and New Year’s is right around the corner, so time to start planning for the Holiday season. In this blog post you will find an ELT Christmas calendar. Why so early? Well, some of these tasks need a bit of preparation.I have suggested different types of activities which can be used with your students. Everything I have suggested can be accessed for free online. Some activities are short and others can take up a whole teaching hour! If you do not teach the same learners every day, then you can mix and match. If you do have the same learners, then you have an idea for each day of the week : D

Monday 1st of December
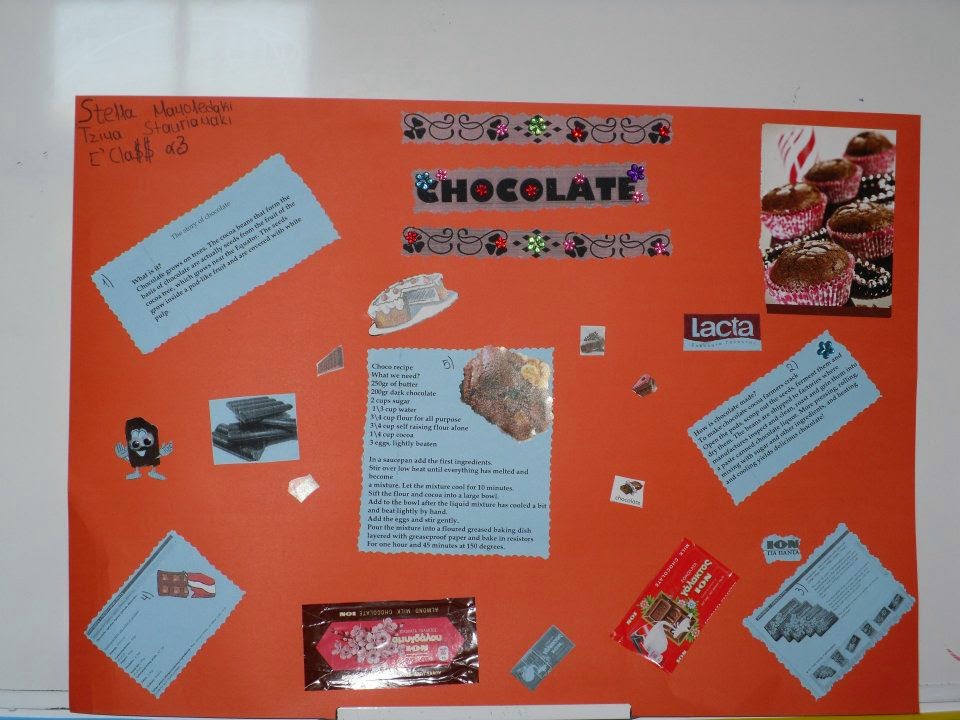
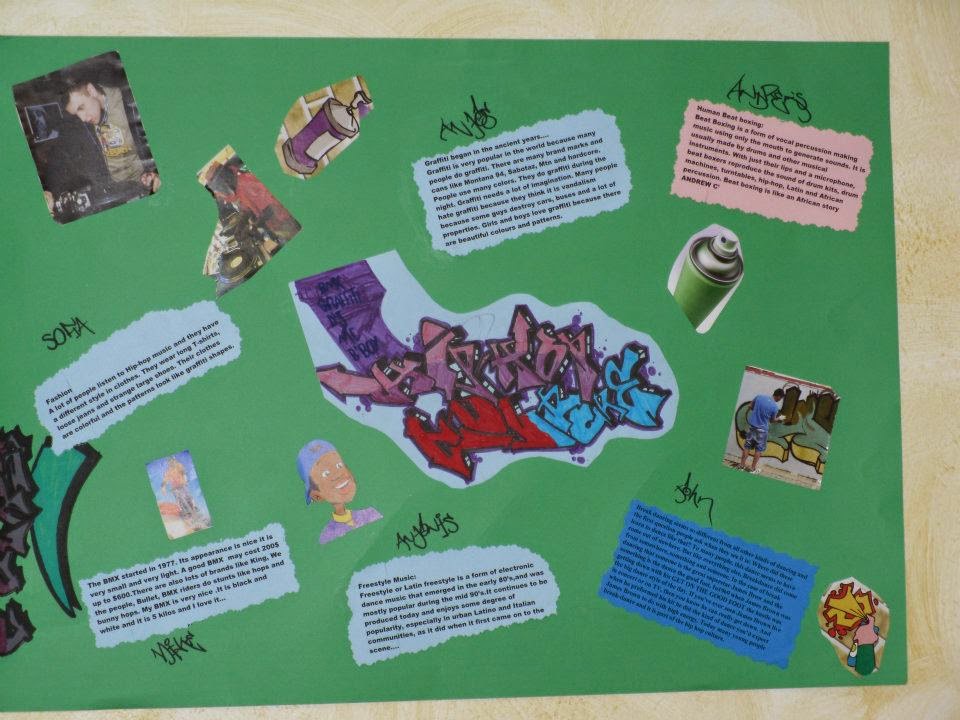
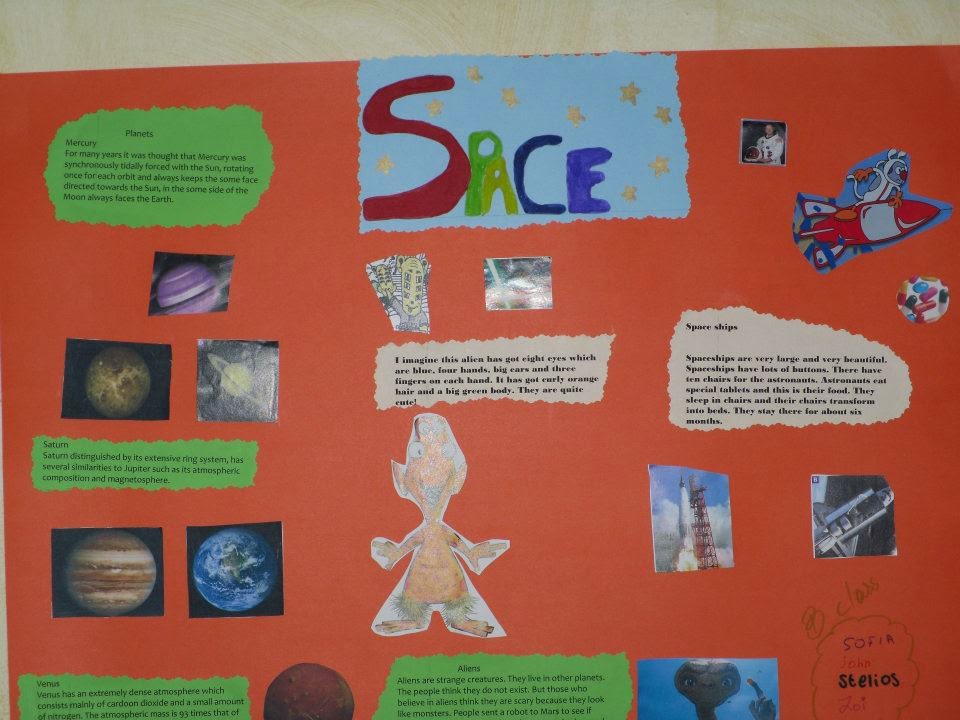
Christmas project. Get your learners to do research and make a project about Santa, Rudolph the red nosed Reindeer, Gingerbread men, the origin of the Christmas tree, the Holidays in different countires and so on. Put them in groups and give them ten days to complete their project. Once they have finished their project, they can give a poster presentation and you can decorate your class with the projects. If you or your students are tech savvy, why not make it a PowerPoint presentation? Don’t forget to look at Tuesday the 11th.

Tuesday 2nd of December 
Christmas gingerbread men streamers. Get a string of paper and get each student to draw a ginger bread man. Then cut out the men and make a hole on the top of the paper and hang it in the class. 
Picture from http://www.enchantedlearning.com. Found here

Wednesday 3rd  of December
Time to make a Chritmas/ Happy Holiday card and write greetings in the card. Your students can make their own cards from scratch so bring out the paper, tinsel, colouring pens and the scissors. The sky is your student’s limit. You can also find a website and use the templates there.

Thursday 4th December
HO-HO-HO  Time to write a letter to Santa or get your students to write their New Year’s resolutions! 

Friday 5th December
 Play Chritsmas Picture or word Bingo. There are many websites to go to and make your  own different set of bingo cards


Monday 8th December 
Time for some Christmas songs/ carols. Find a Christmas song you like, search for the lyrics and start singing with your students. My suggestion: Santa Claus is coming to town.
                              You better watch out

                                  You better not cry

                                          Better not pout

                                                   I’m telling you why

                                                               Santa Claus is coming to town


Tuesday 9th December 
Secret Santa time. Write all your students’ names and put them in a little bag. Then, ask each student to pull out a piece of paper. They must not reveal the name of the person that is on that piece of paper. Each student is that student’s secret Santa.This means they must buy or make a present for their classmate. I would suggest you make some sort of guidelines. You can either suggest students buy something but give them a price limit or that all students make something for their classmate. Allow your students at least a week to make or buy the presents. Once all the presents are bought or made, the Secret Santa needs to put the recipient’s name on the present ( also see December 19th).
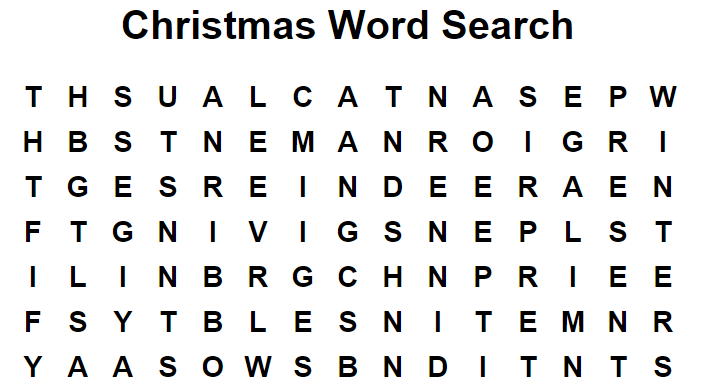
Wednesday 10th December
Christmas word search. Get your learners to look for and find words related to Christmas. Depending on their age, you can choose hard or easy word searches. You can even give them a time limit to make it even more challenging for them.


Thursday 11th December
Poster presentation Day/ Powerpoint presentation Day (also see Monday the 1st).
Friday 12th December
Time for some Christmas songs/ carols. Find a Christmas song you like, search for the lyrics and start singing with your students. Suggestion: Rudolph the red nosed reindeer
                    
                  Rudolph the Red-Nosed Reindeer (reindeer)

                            Had a very shiny nose (like a light bulb)

                              And if you ever saw it (saw it)
                                 You would even say it glows (like a flashlight)
                                       And all of the other reindeer (reindeer) 

Monday 15th December
Pin the nose on Rudolph. How do you play? Your students have to pin Rudolph’s red nose onto his face. If you want to make it more fun, you can blindfold your students and tell them to turn round in circles for a few seconds. Once they are twirling for 6 seconds they can then pin Rudolph’s red nose. 


Tuesday 16th December
Christmas word snake. How is this played? Each student takes turns to write a word connected to holiday season on the board. The final letter of student A’s word is the first letter of student B’s word.
                                      Christmas
                                                       Santa
                                                                 Angel
                                                                           Lantern                                            
                     
Wednesday 17th December
Holiday Season hangman. Time to play hangman with your students! The words again have to be related to the holiday season.
Thursday 18th December
How about watching a movie with your students? What you choose depends on their age and level.
Holiday season movie suggestions:
The Polar Express 
Home Alone
Frosty the Snowman
Miracle on 34th Street
The Muppet Christmas Carol
A Charlie Brown Christmas
It is a wonderful life
Friday 19th December
Secret Santa Day (also see December 9th).  The teacher has collected the presents and starts handing them out. The recipient student then guesses who bought/ made him the pressie. 
Any other teaching days:
Carols+ Party= Happy teacher+ Happy students

Keep in mind that you students get to practice their English whilst doing all of these activities. If you want to add ‘EFL’ twists to the activities, you could make the Christmas carol singing activities into gap filling tasks. You can also ask your students to use the bingo words in the email they send to Santa or make them write a summary after they watch the video. The Secret Santa can be the production stage of a lesson on hypothesising and the ginger bread man can help you teach vocabulary connected to body parts or clothes.What you choose to do with this ELT calendar is up to you!!! 

I hope you enjoyed this blog post. If you have any other suggestions, please add them in the comments section below so other teachers can read them!!!

You can download everything here
It is my favourite time of the year.docx
http://viewer.docstoc.com/
var docstoc_docid=’173140315′; var docstoc_title=’It is my favourite time of the year.docx’; var docstoc_urltitle=’It is my favourite time of the year.docx’;

 Dear reader, if you do any of the activities and have comments or pictures, please let me know. Some of my teacher friends have already shared pics of some of the activities on facebook and I will be making a post about them later on this month!! I would be really interested in seeing how these tasks went for you.

Till next time……….

The 1st conditional

Fun tasks and the 1st conditional
A bit about conditionals
In student grammar books, conditionals are usually divided into zero, first, second, third and mixed conditionals. This post is part of a series of posts related to conditionals. Today, I am going to write about fun activities you can use with your learners when teaching what is known as the 1st conditional.1st conditional
But first, what do I mean by first conditional? My focus is on the form that appears in most ntermediate/ upper intermediate grammar books. Here is the form:

If clause                                                              ,                                            main clause
If + s. present/present continuous (or present perfect)   ,  imperative/ modals/ s. future.

                                                                    OR

       Main clause                                                   if clause
 Imperative/modals/s. future    +  if + simple present/present continuous (or present perfect).

                           E.g. If you use these ideas, your students will have fun.

* Unless + simple present (affirmative form) can also be used (in the if clause instead of if + not).

In my opinion, the conditional is a structure that allows the teacher to use different activities which can guarantee a fun grammar lesson for the students. Below are some ideas for tasks you can use with your learners.

                   Fun 1st conditional task ideas

  • Things to see in London + using a London Tube map:

Tell your students that they are in London. Get your learners to make a plan of where they will go, give them the London tube map and a brochure of the ‘must see’ tourist attractions in London. Your students must make different plans and talk about which lines they should use and what time they should leave. They should use the first conditional in order to make the different plans.

          E.g. If we leave X at 8, we will arrive at 10 at Y.
          If we take the red line, we need to get off at Y. If we get off at Y, we will           then……

  • Video Condition:

The teacher shows part of a video and then stops it and asks the students to guess what will happen next. The students must use the 1st conditional. Video ideas: You can use Sliding Doors (Gwyneth Paltrow movie) which is about what happens if she gets on the tube and what happens when she misses the tube. Another movie idea is 500 days of Summer which has a split screen moment where the hero plays in  his head a scenario of what will happen when he goes to his ex-girlfriend’s party (expectation vs reality).

  • Election game:

This is a game (idea found on Teflnet/Smore) where your students have to imagine they  are running for president. Each student gives a speech about what he/she will do if he/she gets elected. You can then ask your learners to actually vote and see who gets elected as president : )

E.g. If I am elected president, I will give every citizen a free lap top.

Screen shot taken from here


  • Consequence chain:

A consequence chain is like writing a chain story but the learners must use the 1st conditional and write about consequences (for more about this go here). How do you set this up? Well, get your students to sit in rows. One student from each end of the room must write a first conditional sentence. Then hand it to the student next to him/her. That student uses the previous student’s main clause to form an if clause and then adds his/her own main clause and so on.

                  Student A: If you go out, you will meet someone.
             Next student: If you meet someone, you will go on a date.

You can also have a consequence chain talk about global warming where students talk about the consequence of climate change. So for example, if the temperature rises, the ice bergs will melt. If the ice melts, …… (This idea came from a colleague. Thanks Sue Annan).

 
  • Drill marathon:

The teacher gives an if clause and the students have to write as many main clauses as they can. The teacher gives a time limit. The student who has found the most correct options is the winner.

  • Songs:

Here is a list of songs that can be used when teaching the 1st conditional. How can you use the songs? Well, many ways. You can give them the lyrics but first delete some of the words, and before they listen to the song ask them to fill in the missing lyrics with what they think should go there (pre-listening task).You can also get them to fill in the gaps whilst listening to the song. Another thing you  can do is give them the lyrics all jumbled up and ask them to put the lyrics in the right order.
Titles of songs:
If you are happy and you know it….
If you leave me now (Chicago)
If you are not mine (David Bedingfield)
If I lose myself tonight (One Republic)
If the feeling is gone (Kyla)

Screen shot taken from here

You can download everything here:
Fun tasks and the 1st conditional.docx
http://viewer.docstoc.com/

var docstoc_docid=’172447652′; var docstoc_title=’Fun tasks and the 1st conditional.docx’; var docstoc_urltitle=’Fun tasks and the 1st conditional.docx’; Of course, there are many other fun activities teachers can use to help their learners with the 1st conditional. I have mentioned just a few. Feel free to leave some more ideas in the comments section below. I will follow up with a post about the 2nd and the 3rd conditional in the following weeks.

Till next time…….

Helpful links and some thanks:
http://edition.tefl.net/ideas/games/first-conditional-practice/
https://www.smore.com/3n5p-first-conditional-fun
I would also like to thank Sue Annan and Sandy Millin who gave me some ideas for this post : ).

the wonderful world of feedback

The wonderful world of feedback and correcting: focusing on the writing skill.
I have been correcting and marking loads of essays these days and every time I find myself using different types of feedback, so that gave me the idea for this post. So, let’s have a look at different types of feedback and ways to correct.
Teacher’s feedback/correction
  • Error code:
Many teachers use an error code when checking students’ writing. You collect your students’ texts and instead of correcting the mistakes, you use symbols/abbreviations which correspond to language features, you use an error code. So, for example SP. stands for spelling and WW. stands for wrong word. You can make the error code yourself or use something you have found in a book. Either way, you need to make sure that your students are familiar with the error code and know what each initial or abbreviation means.
Error code with a twist: instead of using abbreviations, you can use a highlighter pen. In this case, each colour correspond to a type of error. This may be more suitable for children.


Teaching Tip: Are you sure that your learners know what each symbol means? You may have told them over and over again, but you will still get a student saying, ”I didn’t correct the essay cause I didn’t know what S/V stood for” . No need to worry. I have a suggestion for that! Why not try an error code terminology checker task? What is a terminology checker? Well, you write down the key abbreviations in bubbles and project them, your students then have to match the abbreviation with the definition or tell you what means what.
  • Correcting mistakes:
Well, this type of correction method has probably been used by most teachers. I guess you have corrected your students’ mistakes by drawing a line over the mistake and giving the correct sentence/version. I do this from time to time, but only when I think my learners do not have the knowledge to correct it themselves.
Teaching tip: Instead of just correcting their errors why not challenge your students a bit? Once you have corrected their mistakes, you could make little exercises/tasks which are connected to their errors just to help them practice with the structures/phenomena they are struggling with (I have written a post about feedback Q & A. Check it out here).
  • Comment bubbles/Dialogue with your student:
When correcting your learner’s text it is a good idea to ask questions related to some of the information you find in the text, especially comments related to the content. Something may require more analysis, so you can make a comment bubble and ask, ”What do you mean?” or you may want to make a comment on something that you find interesting and say, ”Great idea!” or ”I totally agree”. The comments you write are totally up to you. Once you hand back the texts, your learners can reply to the questions you ask and then you have a short dialogue.
 
  • Oral feedback:
If you are really tech savvy or if you want to be a bit more fancy, you can send your learners oral feedback or share a YouTube video. The sky is your limit fellow teacher. I have used vocaroo. You go to the website, record yourself speaking and then send your feedback to the learner. One of the benefits here is that the feedback is saved and cannot be lost or eaten by the dog!
                                         http://vocaroo.com/player.swf?playMediaID=s1j71mo4p0pf&autoplay=0
  • Ticking a checklist:
You can make a checklist and put ticks in the appropriate boxes depending on whether the student has fulfilled the requirements of the writing task or not. This type of feedback is more effective when the feedback has to do with development of ideas or specific structures/ language points. So, if for example, you have told your students to write a story, you can make a story genre features checklist and tick the features that are evident in your student’s story.
          The wording of the teacher’s feedback
Telling your student everything that has gone wrong in their writing may turn out to be a boomerang. Be constructive and positive. Put a smile on their faces : ). I prefer wording my feedback comments in the following two ways:
  • Sandwich feedback:
Sandwich feedback is when you give a positive comment, then talk about something your learner did not do well or needs to work on, and then you write another positive comment.
  • You did this/you didn’t do this/you need to:
Just like the sandwich feedback, in this case start with something positive. Then, mention what your learner didn’t do, and conclude with suggestions on the actions that need to be taken.
Student generated feedback/correction
  • Peer feedback:
Peer feedback is a good way to get everybody involved in the feedback/correction process. In this case, one student reads another student’s work and tries to offer feedback or make corrections. You can ask your students to use the error code, correct based on a checklist or  look for something in particular like checking for plagiarism for example. The good thing about this type of feedback is that students often respond well to corrections that come from a classmate. It also makes them more active in relation to the whole correction process.
Teaching tip: Have you ever used a reading circle during a peer feedback session? I often get my EAP students to sit in groups of four. I tell them to look at the introduction of their classmates’ essay, for example, and check to see if there is a thesis statement, a map, author’s voice etc. I also tell them to look for anything that is missing or is not easily understood. I set a time limit (let’s say five minutes) and when the time is up, they have to give the introduction to the next student in the group. This goes on for a few times. Then, each student gets their essay back, but now it has a lot of comments for them to work on. Of course, during a reading circle, you, the teacher, have to monitor and stick to the time limits you set, otherwise you will have some students with piles of paper next to them, and others with nothing to check.
  • Self- Correction: 
I often tell my students to take five or ten minutes at the beginning of a lesson, before they hand in their writing homework, to check their texts and try to see if they can find any mistakes. While they are checking, I monitor and offer any help when asked for it. It is very important to get students to read their texts before they hand them in because very often they give you the first draft of something without even checking it!
  • Using writing assessment criteria:
Instead of you marking your students’ work based on writing assessment criteria, why not get them to look at their work and assess it based on the writing assessment criteria? These type of activities are remarkable when working with advanced learners. It gets your students to reflect on their texts and see what needs work on. I have used criteria sheets in my exam classes and my EAP classes. I strongly recommend you try this with your learners. I would not recommend it for lower level students though because they may have language barrier issues.
Teaching Tip: When you first introduce writing assessment criteria to your learners, it is a good idea to use a sample. Give them a text that has been assessed based on writing criteria but do not give them the final grades. Ask them to assess it and then show them the grades/highlighted criteria. Once they familiarise themselves with the process, they will be able to apply it to their own work.
Screenshot of Ielts writing band descriptions taken from here:
Error/Feedback Log
It is a good idea to get your learners to check the types of mistakes they make and see if there are errors that occur over and over again. If there are errors that reoccur:
1.Your learner will realise that he/she needs to address it.
2. You, the teacher, can include tasks, lessons that will help your learners with structures and language they are struggling with.There are many ways to check your students’ writing. I like to mix and match depending on the learners. I do think though that it is essential to get students to be more active regarding the correcting of their texts.

You can download everything here:

Example of an error code
http://viewer.docstoc.com/

* In this document (colour code section) the computer automatically corrected my spelling mistake so it says your instead of yor (which was the spelling mistake).

var docstoc_docid=’172347092′; var docstoc_title=’Example of an error code’; var docstoc_urltitle=’Example of an error code’;Feel free to leave a comment in the comments section.

Till next time………

Marking projects online: the teacher’s survival kit
I have been marking projects online for some time now (long ones, like 1.500 words) and I must admit… it isn’t easy, although it isn’t that bad either. So, today, fellow teachers, I am going to write a post about the Do’s, the Don’ts and ”OK, this will work” of marking projects online. We do live in the technological era anyhow, don’t we? So, out with the paper and in with the lap top : S.
A bit of context:
At the moment, I am teaching English for academic purposes in the UK. One of the tasks students attending these courses have to fulfill is writing a research project.

Turnitin: This week my students used TurnitinUK and submitted the first draft of their research project. For those of you that have never used Turnitin, it is a website where you register, set an assignment and it is where your students can upload their projects (this is the ‘assignment’ you set). Once the learners have uploaded their projects, it checks them for plagiarism and gives an Originality report. In this report you can see which parts of the paper have been plagiarised and it also automatically shows you the source and the section they copied from. It also has a tab called Grademark which you can use to comment on the student’s work and give feedback. There are lots of different sections which can be used for feedback so it does allow for different types of feedback. There are tabs which let you give oral feedback (you can be all fancy and record your oral feedback). You can use comment bubbles which let you make in-text comments. There is also a general feedback area, where you can write texts. You can use different types of highlighters and you can also import generic comments if you think it is necessary (it definitely saves you time).

Reasons why it is a good idea to mark essays/projects online.

  • It is good for the environment and you/your students save money on paper and… pens. You also save space in your drawers, on your shelves etc.
  • It checks the plagiarism very quickly and quite effectively. There may of course be paragraphs that turnitin or any other software cannot detect but then you can double check by doing a Google check or something else.
  • No one loses their project+feedback. Everything is online. Stored forever.
  • It is good to use as a teaching tool during class. Why? Well, as I said earlier, if it checks for plagiarism, you can see what problems your learners have. You will see if your students have difficulty paraphrasing or if they need help with citations etc. You can then use it with them and show them what they need to work on. The same goes for other learner errors.
  • You can add links to your feedback comments and your students can press the links and practice or check something immediately.

Take baby steps

  • If this is the first time you are marking online, give yourself some acclimatizing time. For your first project, estimate that you will need about an hour or more to mark it. This is because the software you will be using, will be unfamiliar to you, so you will be trying to figure out how to highlight, how to use comment bubbles etc.
What else?
  • Give yourself breaks after every two hours. This is good for your eyes, your back and your hands. You can really get bad backaches if you just sit in front of a pc marking for hours.
  • Start with a project you think will be a good one. Choose to correct one of the stronger students first. If you start with a bad project, you will be discouraged by both the online marking and the project : (.
  • Make sure you have good lighting. If you wear glasses, put them on, and if you are using a lap top, always check your battery. You do not want to be losing any of your comments (some websites save automatically though, so you won’t have to worry if the lap top runs out of battery).
  • Close all other website pages. It is very easy to get distracted by a Facebook message, an email or whatever else you like checking out online. Marking projects online requires a lot of concentration, so steer clear of all other online temptations.
  • Warning: do not be fooled by the fact that you probably only see the title of your students’ projects (in Turnitin for example, you see the titles, once you click the title, then you see the project). They are still very long projects and just because you cannot see the piles of paper, doesn’t mean they do not exist.
Bottom line: It is just like marking a paper project but it just takes a bit of getting used to. I usually read the whole project once. I then check it and make comments, give feedback. Once I have checked all my projects, I go through them once more and tweak my comments or add whatever I think needs adding.
Do I really have to mark online?
Well, you are probably already finding material online, reading online, teaching online. It is now time to mark online. In the EAP world, it is not really an option anymore. It is just they way papers are marked. C’est la vie.
Don’t be scared, just do it : ).
Till next time…….

Journals in EAP

I caught the end of Sandy Millin’s presentation at the TOBELTA Reading and Writing web conference on Saturday.  She had been talking about how she uses journals in her classes which gave me the idea for this post. So, today I will talk about using journals with your EAP students. Is it a Do or a Don’t? Students attending English for academic courses already have a heavy workload, so why add some more work? After using journals with my students at the University of Bristol last year, I firmly believe it is a DO. So, let’s see the How, the Why and the What happens after…….

The Notebooks/journals
Get your learners to use a notebook. It is more… let’s say romantic, a reminder of the good old days when everybody used notebooks and not tablets and lap tops. On a more serious note, it is better if they have something in hard copy, something that is easy to carry around the house, put in their bag. Last year, when I worked at the University of Bristol, the notebooks were given to the students and it had the uni’s logo, which gave a fine touch to the whole journal writing process. If this is not possible in your case, your learners can choose their own notebooks and you will get to see what they choose (I do see  a couple of notebooks with hello kitty on your desk : )).
What should the students write about?
On a weekly basis ask your learners to write about anything, academic and non academic . You could tell your learners to have two sections in their notebook. One section of the journal can be devoted to their everyday life, and the other section to their academic life where they document, reflect on things occurring in their student life. It wold also be a good idea to give them a minimum word limit and give them some ideas on what to write about.
Suggested topics for the everyday life section:
Write about what you did today.
Write about going to the supermarket.
Describe your room.
Write about your plans for the weekend.
Write about something interesting you saw, experienced.
Describe a building you saw .. and so on.
Suggested topics for the Academic section:
Write a paragraph about what plagiarism is.
Write about ways you can avoid plagiarising.
Write down the steps you will take to plan your project.
Paraphrase a source and write down how you did this.
Make notes of the parts of the sources you will be using in your research project … and so on.
Why two sections?
Well, students attending EAP courses are usually international students who have difficulty, not only with their academic English, but also their general English. Also, keep in mind that it is usually their first time in the UK or other English speaking countries, so they are experiencing a different educational environment as well as a new lifestyle. Writing about everyday life will enrich their everyday vocabulary, writing about their studies will boost their academic English.
Which brings me to the next question.
Why should my EAP students write in a journal?
Well, firstly, they need as much writing practice as they can get. Although academic writing is more important for them, I do find that they lack knowledge of everyday simple English which is why I suggest having two sections in their journals.Another great reason, worth mentioning, is that they can see how their writing has improved. A journal also allows them to see if they are repeating the same errors over and over (maybe next time they will be more careful when using the structure they struggle with).
When do I collect the journals and what kind of feedback do I give the learners?
I collect my students’ journals twice a month and my feedback varies. I correct some mistakes, I use an error code and I also ask questions about some of the things they write in their journals. Something like content feedback questions. So, if my student mentions, for example, that he went to the cinema, I then ask, ”What did you see?” I also use smiley faces  : ) or sad faces : ( depending on what they have written. After having a look at their journals, I give them back to them and then my students can correct any errors and answer any questions I have asked them. If I see general errors occurring in most of the students’ journals, like for example, a problem with using the present perfect vs the simple past, I then include this grammar structure in my next lesson or give them links for self study tasks.
Do the learners enjoy writing in journals?
In the beginning due to the heavy workload they already have, some like the idea, others are a bit reluctant whilst a few can’t be bothered, but later on, they really get into it, especially when they see something come out of the whole journal writing process. Icing on the cake: It is interesting to see the written dialogue that develops among my students and me in regards to the content questions I ask them.
Bottom line
This can be a fun writing task for your learners. It also gives them the opportunity to reflect on some of the things they are asked to do in the EAP classroom. Sometimes writing down a plan of a project makes it less daunting, making comments about a source can help them be more organised and so on.
So….
give it a try with your EAP learners. There is nothing to lose. Worst case scenario is that they stop writing. best case scenario, some of your learners will really enjoy it and will become slightly better writers because of it.

Final thoughts….
At the moment I am in an EAP state of mind, most of my posts are related to English for academic purposes because, well, that is what I am teaching. I will soon be back with other types of wordy rambles! I hope you enjoyed this post. Let me know if you have used journals with your EAP students and how this worked for you.

Till next time……..

A pic of a rainy Sunday in the UK : )


Summarising

Academic Writing:

The post about summarising
Last week, I wrote my first post about academic writing. My focus then was on addressing plagiarism and helping learners develop strategies that will enable them to paraphrase information in order to integrate sources into their own writing and then cite it (you can read that post here). Another writing skill your students need to develop is summarising. In fact, in academic writing summarising information found in a source is as important as paraphrasing or reformulating. A summary that is not paraphrased/ reformulated well may lead to plagiarism, a paraphrase that is too long may lead to word count problems etc.

Picture credits: Illustrator unknown. Accessed online here

One step at a time
Here are some tips on how to get your students to summarise information they found in a source in order to use it to either synthesise information or integrate sources into their own writing (teaching tip: get them to paraphrase/reformulate first and then summarise). Begin with explaining what a summary is. Show them examples of good summaries and bad ones. Elicit their understanding of why one summary is good and why another is bad. Keep in mind that you also need to stress to your students that their summaries need to be paraphrases/reformulations of the original sources because if they aren’t, your students are still plagiarising.
Sentence frames:
So, now they understand what a summary is. You can move on to tasks that have sentence frames. Give your learners a text with its summary underneath it, but erase some of the sentences. At this initial stage your learners only have to fill in a few sentences that are missing.
Video viewing:
Who said you should only summarise texts? Why not start with something fun and something that is a bit easier than a dense academic tense? If you are teaching a general English class, you can choose whatever video you want. The sky is your limit. If you are teaching an EAP class, well, of course the sky is your limit as well. My suggestion is to start with something fun and easier to tackle and then show them a clip of a lecture. The goal is to get them to write a summary of something they have watched. this is challenging of course but fun.
Why use a video?:
  • Your learners can better comprehend because even if they have unknown words, they still have the visual to help them. 
  • It is fun : )
  • It caters different learning styles, engages different skills.
  • They do not have a text in front of them so it is supposedly harder to plagiarise.
Some disadvantages of using the video:
  • they may not know how to take notes and may end up just writing whatever they hear, making it difficult for them to write a coherent paragraph later on.
Jigsaw reading:
I guess you do jigsaw reading tasks with your students, so why not have a jigsaw reading task that will prompt a summary? So, how would you organise this? I suggest you do this as a pair work task. Give half a text to student A and the other half to student B. Each student reads their own text and makes notes of some key points. Once both students have read their texts and have made some notes, you take away the texts and just let them keep their notes. They then have to use their notes to tell each other what the text is about and write a short summary.
Summary challenge:
 You can start with summaries that are long paragraphs of say 150 words and move on to one sentence summaries! Add some drama, will you? Your learners need to actually be able to write one or two line summaries when they are integrating sources into their work, so start with something easier and move on to something harder.I would once again suggest writing a group summary, a pair summary and then each student works on their own summary. Give them a word challenge as well. Highlight numerous words they are not allowed to use in their paraphrased summaries.
Final thoughts
Teaching your learners how to paraphrase, reformulate and summarise are very important skills. Students require a lot of training before they can become successful writers. Approaching academic writing in a fun way,scaffolding your learners, mixing and matching tasks, doing group work and pair work aims to help them better their writing skills. Feel free to add any other summarising ideas in the comments section. I love getting feedback from you guys!!

Till next time……..

The poster presentation

   End of the year event for my young learners

                     The poster presentation project

So, it is that time of year again. The end of the academic year is right around the corner and you may be thinking, “what can I do at the end of the year with my students?” How about holding a poster presentation event?
I did this with my students two years ago and they loved it.
What is a poster presentation?
If you have been to a conference or taught on a pre sessional English course, you probably know what it is, but for those who haven’t, a poster presentation is when somebody makes a poster and then talks about it. I first attended a poster presentation when I was working at Newcastle University as a pre sessional EAP tutor. My postgraduate students had to make a project based on an idea related to their research project, they then presented their projects to their classmates, and finally answered questions related to their posters/projects.
Making the poster presentation suitable for my young learners.
After seeing how this works in the EAP context, I thought, “Why not try it with my younger learners?” and I did!Here is what happened!
STEPS before the end of the year poster presentation event.
1.Each class chose a theme. My students chose to write projects with the following titles:
  • the things I like
  • music
  • chocolate
  • space
  • the sea world
  • the hip hop culture
2. After choosing a group theme, my students had to find pictures and information about something related to their theme. For example, in the sea world project, each student had to find information related to a sea animal.
3. When they each wrote their own texts and found pictures, we looked at their texts and made any corrections that were necessary. My students then rewrote their texts on colourful paper which they then stuck to a bigger cardboard sheet. The end product was a colourful poster full of students’ contributions and pictures (scroll down to view some images).
4. Once the poster projects were ready, the students prepared little mini presentations based on their texts and they all collaborated so as to be able to give a whole presentation based on their theme. Each student spoke for about a minute and they decided on when each of them would speak. They rehearsed their presentations quite a few times until they felt comfortable presenting.
5. A few days before the event, the students were given invitation cards to give to their parents.

On the day of the event.

The parents came to my language school and went to all the classrooms and heard all the students presenting their projects. The students got lots of rounds of applauds and there were a lot of smiles going around. All the parents voted for the best two presentations and at the end of the event the project with the most votes got a toy cup. All the students got a certificate of participation and a little present. We ended the day with drinks and snacks.
Why will I do this again?
First of all, the students and parents are asking me if we will do it again because they really enjoyed it. So, that’s one good reasong to hold such an event again.
I also appreciated the fact that my students researched themes they liked, were able to talk a bit about them, did group work and prepared a project with a lot of enthusiasm.
What would I change?
I would make a little map of the language school and write down which group is in which class.This will make it easier for the parents to know where their kids are. I would change the voting system to three votes (cause with the previous system, all the parents voted only for their children. Now, they will have one extra vote). At this point, I would like to say that I asked the parents to vote for the best projects so the whole event could be a bit more challenging for the learners and it does serve as some form of assessment. I had a group that was not very motivated last time, but this year they are already telling me,” Miss, we are going to try harder because our project was not well-prepared last year.” I would also get the students to ask each other questions about their projects so they feel more comfortable talking about their projects. I will ask my learners and the parents to give feedback about the event and my stduents to reflect on the whole process as well. I am really interested in seeing what they think of the whole process, the stages and so on.

This is a great end of the year event (you can even do it with just one class). I really think you should give it a shot!

 Till next time…
EAP poster presentation. Newcastle University 2012
                                        2012 Poster presentation at my language school

Why am I studying at 38?!?!

Why am I still studying at 38?!?!

Every single decision we make regarding our career, every single diploma, certificate or degree we get, defines us as teachers. I am a firm believer of whatever we learn, even the most useless piece of information, may be useful in the future. It may open a window where a door has closed. So, this is me, talking about some of my choices, the teachers I met, and how they have made me the teacher I am today. Am I a a grand educator? Nope. Am I trying to improve? Definitely!

I spent my childhood in Sydney and moved to Greece when I was thirteen I did not speak much Greek at the time, I thrived in English though, so it was only natural that I studied the language. I got a B.A in English language and Philology. My minor was linguistics and my major was literature. After four years at uni, I thought, “Ok, now I can teach!” It is what the  ministry of education says anyhow. Most of my modules were theoretical and I didn’t have much practical knowledge or was I observed during the course but “hey, I got my degree” so “yeap, I could teach” and I did for a few years. Then, I felt that I needed to learn something new, my degree was not enough after all, so I decided to do a Master’s of Education in TESOL. I was lucky enough to have a great supervisor, Dr. Nicos Sifakis, during my final year and a person who still helps me when I ask him something. I finished my M.Ed. and thought again, ” Now, I have a Master’s degree… I am a researcher.. I know loads… I am going to be a Queen Bee in my classes”. It was easier to find jobs and I felt much more comfortable in my classes. My M.Ed. actually gave me the courage to apply for pre sessional EAP courses and I got my first job working at Newcastle University during the summer of 2011. EAP courses in the UK were a whole new experience. I had great managers, Darran Shaw and Nicky Collins, who believed in me, and helped me a lot, and lovely colleagues who now are dear friends. I also met my lovely friend Deirdre at Newcastle. She introduced me to Wefit solutions, where I am currently teaching Business English online. This is a whole new experience.
Newcastle was also the place where I heard about the Delta for the first time but remember, I was a super duper teacher now with an MA so.. did I really need the Delta?
After long talks with colleagues, and seeing the requirements and reading lists, I decided to do it. And I did. I passed module one by myself and then took a blended online course at CELT with Marisa Constantinides.   Apart from all the great things I learnt during this course,the observations, the feedback, Marisa got me into blogging and tweeting. Blogging allows me to just keep talking : P and tweeting is a way to stay informed and meet lovely people, grow my PLN. I also met Angeliki, my Skype support buddy and the person who got me interested in TESOL conventions (my first presentation ever was at TESOL Greece, this year!), Lia, who is the person who shares stuff with me all the time, and Ola who said, ” Go Jo! You can do it” when I was on the verge of giving up cause I was too tired to continue studying. I didn’t quit. I passed module two and will be taking a little break before module 3 cause I need a break people!
Now what? Now, I know that I still have things to learn. I want to do a Business English trainers course as soon as possible and I am also thinking of doing a PhD.
Why? As I said at the beginning, you may be the best teacher in the world, but ELT changes and you got to keep up. What you, as a professional choose to study and invest your time and money on, will only help you excel. You cannot lose! So, continual professional development it is! You also need to be open to meeting people and learn from your colleagues! Be open to people and keep your antennas up for study opportunities!

                                    Picture credits: http://arcsofia.org/node/393

There are many people who I met during my studies and work but unfortunately I cannot fit everyone in a blog post. It is wordy enough as it is… : )

Till next time…..

Students choosing material

Students choosing the material… a Do or a Don’t?

I asked my C1 level students the other day to choose some articles they would like to read and use in class and then it hit me… is this a good idea or a bad idea? Well, in this case (the first stage of this choose your own material part of my C1 sessions) it was a great idea cause my learners sent me some really interesting articles : ), on issues I did not think they were interested in! I am providing the links: 

Why get your students to choose articles they want to read and talk about?

1. They are online 24/7 anyway (well, mine are!) so getting them to do one more thing online is not really asking for too much on their part.
2. They will have to read a few things before they actually send you the article (or atleast I hope they will…) and truth be told the more they read, the better! The more exposure they have to reading texts, articles in this case the better. Even just reading a headline can be helpful!
3. They choose articles they find appealing. This means that they will be more motivated to:
  • find unknown words.
  • present a short summary of what they read/ talk and elaborate about something THEY are interested in.
  • use their article as part of another task like a project.
4.  Authentic material like newpaper articles, give them exposure to real language. It may be dense in language they are unfamiliar with, full of colloqualisms, idiomatic expressions etc but it is a great opportunity for them to learn new words if they come accross something they are interested in. On the plus side, they will feel great content when they manage to understand a real web article.

Things to be careful of:

1. Give your learners some sort of word limit. You don’t want some of your learners bringing in a mega giga article and the rest itsy bitsy ones!
2. Ask them to send you the link to the article before they bring it into class so you can check it for any inappopritae material. You may also want to make some further reading tasks, vocabulary tasks and so on. Having the articles beforehand is useful for you as a teacher.
3. Choosing articles may be better for students who have a good control of language. Students who are not above intermediate level will probably struggle when given authentic articles. Instead of being motivated they may end up being discouraged.
4. Give your students clear instructions as to what you want them to do with the article. In my case i told my students to read the article and prepare a short oral summary of what the article says. I also told them to make word cards with their unknown words on one side and the explanation on the other. As homework, and after we have read the articles in class, I am also going to ask them to write their own reading comprehension questions based on the text and we will revisit these articles+ their reading comprehension questions in the next lesson.
Screenshot of newmap. Link to this website: http://newsmap.jp/
I am really looking forward to this session. I will back with a new post about how it went.
Till next time…..

A few days after Belta Day

A few days after Belta Day

Last Saturday (22nd March) I attended and presented at the Belta Day in Brussels, Belgium. The day started with a warm welcoming from the Belta president James Taylor and  was followed by an inspiring talk by Jeremy Harmer. After that, there were some very interesting breakout sessions. The second plenary by Luke Meddings  gave me a lot to think about regarding the material I use in the classroom and Dogme. Then came another round of talks. These breakout sessions were followed by some swap shop sessions where teachers exchanged views about what they heard during the conference. The day concluded with a small goodbye reception and then we all went home.

                                                      A closer look

The plenaries:

The plenaries were thought-provoking and very interesting. They made me reconsider some of the things I do in class but also validated some of my practices.

The breakout sessions:

There was a variety of sessions so you could choose and attend the ones that you were more interested in.

The people:

Wonderful! Everyone was very helpful and friendly. I can say that I met some really nice people which I hope to see again some day in the future.

My presentation:

I apologise for sounding like Kermit the frog, but I was recovering from the flu. The people who came to my talk were very encouraging and highly interactive. I hope those who attended felt it was a good talk. I would like to thank some of the teachers who actually emailed me or sent me a message on Facebook regarding my talk. They put a smile on my face : )

The swap shop sessions:

They were great! At last an opportunity to talk about everything you heard at the conference! I loved them! They also informed me about sessions I did not attend.

The raffle:

What can I say? I won Jeremy Harmer’s book and he signed it too : ) Yay!!

Thanks to everyone at Belta for making it a wonderful experience!

Till next time….