This post was prompted by Alex’s question on a post I wrote about EAP presessional courses. His question was simple.
You teach EAP during the summer, so what happens the rest of the year?
Instead of answering in the comments section, I though I’d write a quick post, just to tell you my context which may be similar to yours.
Sheffield University ( Department of Music)
I live in Greece and the school year is from September to end of May (private 1-2-1 teaching). I also teach Business English online. There my students are grown ups with kids, so they take summer holidays when schools are shut (same time as I do).
This means that every summer from mid June till mid September, I am free. I do not have that much work and that’s why Pre-sessional EAP courses are great for me. I ❤ them. I get to teach in a different context to what I do in the winter. I work at a university, which is really challenging and stimulating, my learners are from a different country altogether AND I get to be in the UK which I love.
Why don’t I teach EAP all year round? Firstly, I have not pursued it (not that any one has asked me to stay-just to be clear, eh?). Secondly, I have never lived in the UK during the winter, so dunno if I can handle it!! I am from the south people!
You may also ask, do I mind working all year round? Nope. I kinda have to work all year round if I want to do the things I do. I am not complaining, and anyway I am a workaholic, a shopaholic/travelaholic or just a spendaholic. I work, enjoy my job, make money from it, spend my money. Simple stuff.
Of course I miss out on the Greek summer, but if you think about it, the summer in Greece lasts from May till end of October. It’s always warm, especially on my little island.
So, there you have it. That’s how and why pre-sessional courses work for me. This summer I will be going back to Sheffield University for their 10 week pre-sessional course. Cannot wait!
Do you teach pre-sessional EAP courses or a summer school course? Tell me your story in the comments below. Don’t forget to follow my blog if you are not already and give my Facebook page a thumbs up so that you do not miss notifications! You can follow me on Twitter/Pinterest/Instagram
A while back I asked Tekhnologic if he could help with graphs that are more appropriate for colourblind people. We sent lots of mails back and forth and this is what that collab resulted in. I really appreciate the help and I hope you find this post helpful, not only if you have colourblind students, but also if you teach presentation skills and want to show your students a different type of presentation. I am reposting Tekhnologic’s post (our collaboration).
Repost
Back in January, Joanna Malefaki from My ELT Rambles asked me if there was a way to customize charts so that they were more color blind friendly.
She wanted to create charts that weren’t just based on color. She wanted to incorporate lines, dots and patterns. So, Joanna and I ended up collaborating for some time; emailing drafts back and forth and designing some examples.
That collaboration eventually resulted in this post.
Joanna has written an introduction that explains a little bit about color blindness before I continue by discussing the examples and tutorial videos.
An introduction into using images rather than colors for pie charts. Images not only clearly illustrate information but they also make your charts more visually appealing.
Seeing just black and white is extremely rare. Most people are red/green colour blind and more rarely blue. This does not mean that people confuse their reds and greens, it actually means that they have trouble seeing shades of these colors and colors that are formed with these colours.
I am color blind and reading charts is very difficult for me.
I am color blind and reading charts is very difficult for me. Very often people create graphs that use a lot of colours to display whatever they want to showcase. When I told tekhnologic I would like some help with graphs, he decided to help me out with these excellent tutorials on how to make color blind friendly charts.
I gave him some suggestions as to what to avoid. I asked him to:
Use a white background and dark fonts.
Not choose colours that are hard for colour blind people to distinguish.
Try to find different icons or anything else that could be used to show the results of a survey, research or whatever else a chart is used for.
These tutorials are what he came up with and I think they are extremely helpful not just for people who are color blind, but also for people who would like to make their presentations more memorable!
Joanna
You may also want to watch this video from colorblindawareness.org. It’s part of their #1ineveryclassroom campaign and it’s been made to help people understand the difficulties faced by color blind students. Although it is more for teachers of young leaners, I think it is worth watching regardless of the age group you teach.
And as the song says:
Give a helping hand and be understanding of my point of view.
#2 Line Charts
When you insert a line chart into a presentation or document, the default setting is to differentiate the lines by color only.
However, as you can see in the example above, I have attempted to make the chart easier to read by using different line styles with symbols to explain the information. Instead of simply referring to the yellow line, why not talk about the yellow dotted line or the yellow dotted line that illustrates a gradual increase in reading?
Creating a Line Chart
Go to the insert ribbon and click on add a chart.
Choose line chart from the list on the right-hand side and select your style before clicking OK.
Enter your values for the chart.
Enter values from a text or sources.
Or generate a random chart by typing in the following formula: =RANDBETWEEN(1,100). Copy this formula into the other cells and you will generate a completely random chart using random numbers.
Change the chart by pressing F9 – this will recalculate the formula and generate new random numbers.
Don’t choose colours that are hard for colour blind people to distinguish.
This was one of the requests from Joanna. She wanted contrasting colors and different line styles to make the lines easy to distinguish. So, we need to format the lines.
Formatting the Lines
Select one of the lines and go to the format ribbon.
Select the line color menu(shape outline menu) and choose your line color.
Return to the line menu and choose a line style.
You will see five icons under the color selection. Choosing a custom color, the eyedropper tool, width options, line style options and arrows. Line style options is the second from the bottom.
The other way to format the lines is to open the format pane.
Select one of the lines and right-click. Click on format data series.
The format pane will open. Click on the fill line icon.
There are two sections. The line section and the marker section.
The line section allows you to change the color, transparency, width, number of lines and line style.
The marker section allows you to create a marker and change its color, size and shape. Markers represent the data points in the line.
It’s such a quick and simple trick to change the line style, but it can really make a difference and make it so much easier to distinguish the different lines.
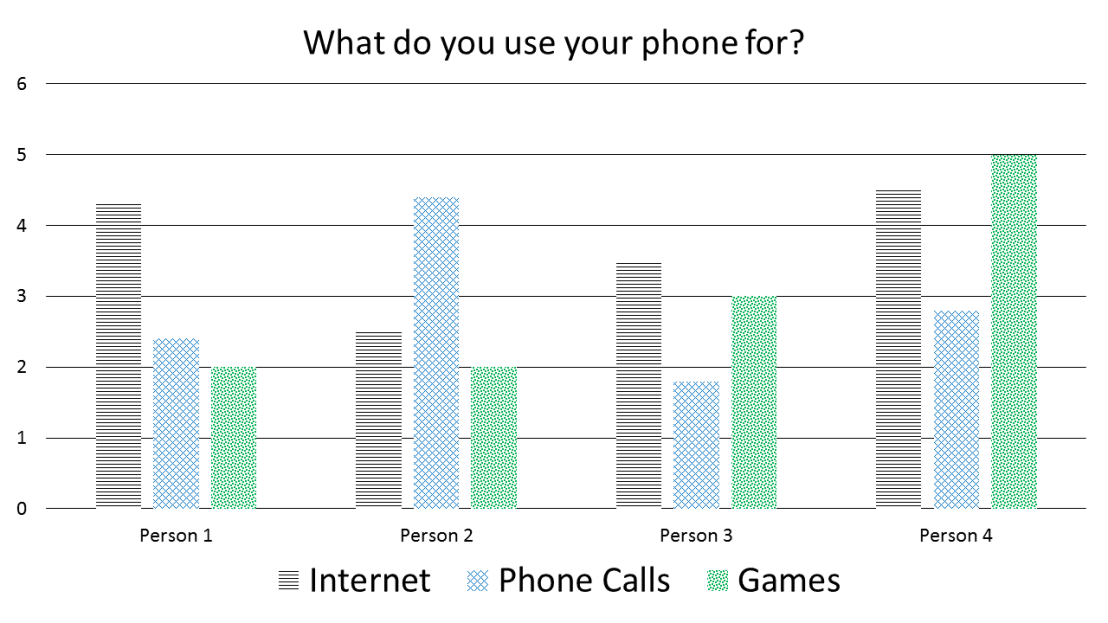
#3 Bar Charts
In the same way we can use line style to help differentiate colors, why not use patterns with other charts.
In the example above, I have attempted to make the chart easier to read by using colors that are easier to distinguish and different pattern fills. I also increased the size of the legend, so it is easier to read the text, but it also easier to see and match the patterns. Instead of simply referring to the black bar, why not talk about the striped black bar or the striped black bar that illustrates Person 1’s internet use?
Creating a Bar Chart
Go to the insert ribbon and click on add a chart.
Choose bar chart from the list on the right-hand side and select your style before clicking OK.
Enter your values for the chart.
Enter values from a text or sources.
Or generate a random chart by typing in the following formula: =RANDBETWEEN(0,10). Copy this formula into the other cells and you will generate a completely random chart using random numbers.
Change the chart by pressing F9 – this will recalculate the formula and generate new random numbers.
Use a white background and dark fonts.
This wasn’t only important for the text, but Joanna also pointed out that it was important for the pattern fill. I had originally used a darker background in the pattern fill, but it made it more difficult to distinguish the shapes.
Formatting the Bars
Select one of the bars and all the whole group of bars should be selected. Click again and you will select only ne bar in that group.
Right-click and click on format data series.
The format pane will open. Click on the fill line icon.
Select pattern fill from the fill options.
Choose a light background color and a dark foreground color.
Select your pattern from the options available.
Repeat for the other bars.
Use contrasting colors and a different pattern for each bar.
Similarly with line styles, a pattern just makes it easier to distinguish different elements of the chart.
#4 Pie Charts
You could use pattern fill with pie charts as well, but using images can make attractive charts that are easy to understand.
In the example above, I have used a different image for each segment of the pie chart and I also increased the size of the legend, so it is easier to read the text, but it also easier to see and match the images.
Creating a Pie Chart
Go to the insert ribbon and click on add a chart.
Choose pie chart from the list on the right-hand side and select your style before clicking OK.
Enter your values for the chart.
Enter values from a text or sources.
Or generate a random chart by typing in the following formula: =(RAND()+RANDBETWEEN(0,25)).
=RAND() generates a random decimal number between 0 and 1.
=RANDBETWEEN(0,25) generates a random number between 0 and 25. Adding both those formulas together will give you a random number between 0 – 25 to at least 7 decimal places. (up to 25.9999999)
Copy this formula into the other cells and you will generate a completely random chart using random numbers.
In the last cell write the formula =100-Sum(B2:B4). This will calculate the remainder out of 100.
Change the chart by pressing F9 – this will recalculate the formula and generate new random numbers.
Try to find different icons or anything else that could be used to show the results of a survey, research or whatever else a chart is used for.
This was another request by Joanna. I used icons and symbols in the line chart example, but you can equally use images. ELTpics has a huge selection of images that can be used to make your charts look both attractive and informative.
Formatting the Segments of the Pie Chart
Click once to select the whole pie chart, click again to select a single segment of the pie chart. Only one part of the pie chart will be surrounded by blue dots.
Right-click and select format data point.
The format pane will open. Click on the fill line icon.
Select picture or texture fill from the fill options.
Click on file.
Select your image and click on insert.
Repeat for the other segments.
Because images contain a variety of different colors, patterns and textures they make it very easy to distinguish different parts of a chart.
I hope these tutorials are of some use and just remember the advice Joanna gave to me. Use white backgrounds, choose your colors well, use images and symbols and format your charts so you don’t only rely on color to read them.
Charts can be inserted into most Microsoft® Office® products. For more help, visit https://support.office.com/
Tekhnologic made some video tutorials for each of these graphs and you can find them on his blog. Press here. He will be doing a follow up, so stay tuned and make sure you follow his blog cause he writes excellent posts.
Back to me:Some final thoughts
I have written about colourblindness so many times. I am trying to raise awareness. Being colourblind is not just about not being able to coordinate your clothes!It is so much more. As teachers, you really need to consider your learners’ needs and if there is a colourblind student inyour class having knowledge is the best way to go.
Thanks for stopping by! Oh! Don’t forget to follow my blog if you aren’t already.
OK OK! So, I know loads of you guys have written blog posts or have thought about whether or not it is a good idea to use a course book in class or not. Well, here is my take on the issue now that things have calmed down.
First let me give you some context. My reality.I use coursebooks (eyes rolling already?!?). Yeap. For many reasons.
I have one to one lessons with Greek kids who are preparing for an exam. Parents and students expect to buy a book. It’s a tradition!Ain’t gonna go against any tradition. I am weak. I am also poor. I need learners/students to make a living. If I don’t have a book, parents would wonder, ” What does she do with my kids? Where do they write stuff”.
I teach many, many hours and that makes it very difficult to find material for each and every lesson/ student (eyes rolling even more). I do not have the time, the stamina, the patience for that. I am too old! Also, I do not want to work all day (There! I said it!)
I choose books from respected publications and I assume that research has gone into them. Someone with qualifications has carefully chosen the material.
I don’t like giving 1000 handouts only to have pieces of paper flying around, getting lost or chewed up by a dog. Most of my learners are young. I have had this problems with EAP learners too. When there was no coursebook, students would lose stuff!
There ARE some good books out there. There are good exercises accompanied by interesting texts yada yada yada. Not everything is rubbish (the word rubbish is an overgeneralisation which is a big No No,but for dramatic purposes, let me go with the overgeneralisation).
Books and using them is not something I have to do. I choose it. The same way I can choose to supplement material or completely throw out a unit/lesson I disagree with. Using a coursebook is not something set in stone. Bottom line is. My book is a tool. I choose how to use it.
My book is what I make it. I can ask my learners to choose what they want to do from the book. I can choose what you will do from the book. I can ask my learners what changes they would make to the book and they can go and design new lessons. You don’t like your coursebook? Adapt it. Have your students adapt it.Having said that, even if I only had a rock to use in class (or something equally boring), I would probably be able to teach something. I would rack my brains all day long till I come up with something.
So, there you have it. Yeap. I use coursebooks and I don’t have a problem with them.
Now it’s your turn to say whatever you want to in the comments section below. Don’t forget to follow my blog so you don’t miss out on any of my fabulous rambles! Give my FB page a ‘like’ so you do not miss a post (check sidebar). OK. That’s all folks. Excuse the sarcy (?) tone!! Dunno what happened to me today. Thanks for reading xx!!
There are a lot of videos on Youtube about the 29th of February or explaining the leap year. I chose this one cause it is clear and quite easy to understand (B1+)
A video explaining the leap year
Apart from reading, talking or watching a video about the leap year or February 29th, you could also get your students to write an essay or a letter to themselves (this does not require watching or reading anything about February 29th)
Ideas for writing
Write an essay about what you would like to have achieved/ done before February 29 2020.
Write a letter to yourself telling him/her what you want your life to be like in 4 years from now. Or anything along those lines.
Tell your students you will be keeping this essay and making a poster out of it. When 2020 is here, you can have a look at the post again. You could also put the essays in a bottle and keep it somewhere in your class. You can also take a class photo and add it on the poster/ bottle.
Time Capsule
Turn this into a more creative class activity by making a February 29th time capsule. Tell your students to put things in this box and that future students will open it on February 29 2020. They can find newspaper clippings, they can make lists of popular songs/ games/ movies. Anything. They make the time capsule and it is stored somewhere in the class.
So, sorry if this messes up your Monday plans, but I think it would be fun to do something different on a day that is here every four years!!
Do you have any other ideas? The comments section is all yours. Don’t forget to subscribe to my blog or follow me somewhere somehow on the different types of social media shared on my sidebar.
Every year, right around Christmas, if you go to jobs.ac.uk or Baleap.org.uk, you will see EAP tutor posts being advertised. If you are interested in working in the UK during the summer, keep on reading. If you are curious about seeing what info I put in my CV, keep on reading. If none of this appeals to you, then, well, see you in my next post :).
So, let me begin by telling you what these jobs are. Pre sessional EAP courses are preparatory courses for post-graduate students or undergrads (more frequently students who want to continue their studies by doing an MA in the UK). The majority of the students are Asian students.
Step 1: Check out jobs.ac.uk or Baleap.org.uk. Find a post you are interested in. Then,
Download the Job Description
Once you have decided where you want to apply to, download the Job Description pdf. All posts have a document or page for this. Read it carefully. There are very often tables with essential criteria and desirable criteria. Make sure you fulfill the Essential criteria before you start your application.
There are also person specifications or teacher characteristics each Uni is looking for in an EAP tutor. They are usually in the same document. Read these very carefully and make notes of the ones you feel you ‘have’.
Your CV
Put your contact info at the top. If there is a reference code for the job, have that at the top as well.
Summary
Have a short summary of your qualifications and your work experience (very short summary!!!).
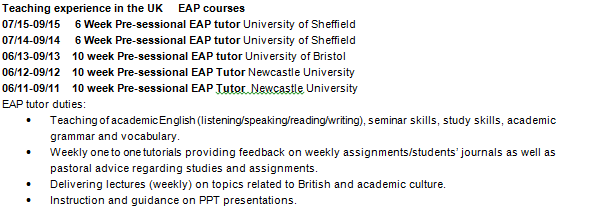
Start with your Work Experience. I use bullet points. I have the most recent job at the top and move down chronologically. I have experience teaching EAP, so I mention what this experience is ( I use bullet points and mention what my duties as an EAP tutor were).
Personal Skills/ Competencies
Write your CAN DOs/ Person specifications: This is where the notes you made will come in handy. Say what you do well. How you work with others. Your personality traits. Do not make things up because when you have the interview you will get a questions along the lines of “How do you work with others?” Or ” What can you bring to our programme?” Or ” Talk about a difficult moment and tell us how you dealt with it.”
If you feel like an ‘expert’ in something, say where.
Move on to Qualifications/ Education: I include my grades and specific information about my Master’s degree (very brief though. One line long) and my Delta module 3 spcialism (it was on academic speaking, so very relevant in this case- again one sentence long).
Articles/Publications
If you have written anything, include it in your CV.
Awards/ Scholarships
If you have been awarded a scholarship, mention that as well.
Conferences/ Presentations
Have you given any presentations at conferences or online? Put them in your CV.
Other Skills
This is where I put down my IT skills and languages.
THE END
No hobbies in this CV people. Who cares if you swim? 🙂 🙂
Top Tips
Keep the information you mention relative to the job. You are applying for a job that will ask you to focus on the teaching of academic reading/writing/speaking/ attending lectures, presentation skills etc. The fact that you have a lot of experience teaching young learners arts and crafts does not really matter. The fact that you talk IELTS does. So, keep your CV to the point.
Sure you have done a lot in your career, but only mention what matters.
Don’t have too much white space.
If you went to a conference back in 1988, it doesn’t matter. It’s too old!
Keep your CV two pages long. The people recruiting teachers for these jobs do not have all day long to read your CV.
Of course I am not a CV expert. I did get advice from a website that gives free CV advice though. So, good luck everyone! I will be in Sheffield this summer :). I hope you found this post helpful. Remember to follow my blog (check sidebar ofn how to do this) and maybe even give my facebook page a ‘like’?
“I want to do a lesson on football” the learner said. ” Ummmm. OK!” The fashionista in me panicked. “So, now what?” Well, I did what every sane ‘I know nothing about football’ teacher would do. I went to Facebook and asked my PLN. Everyone came to my savior and today I am helping my fellow fashionista and non-fashionista teachers out. So, you want to talk/teach something that is based on the topic of football? Here is what I have.
I actually found this video very interesting (physics used to explain a free kick).
Ellen video
I watched this video and found it so funny. It is of a football match in Greece. Dunno how you can use it in the class, but I thought I’d add it to put a smile on your faces :D.
Rachael mentioned this book: Express Series: English for Football: A short, specialist English course which you can get *here
Sue actually sent me a lesson plan ❤ ❤
So that’s all folks. If you have any other suggestions, please leave them in the comments section below :). Enough with the football talk. I gotta go put on some makeup now 🙂 ❤ ❤
This post is a reblogging from blog number 2. I have already written about my adventure as a language school owner, but since I always am more of a borderline ‘personal’ blogger, I will share with you some more thoughts.
Original post
Everyone shares success stories. How to make money, how to be a super-duper business woman/man, how to succeed here, there, and further. Well, this post is about failing. Being a failed business woman. THIS is not a success story….. or is it? It’s more about me, finding myself, and learning from my trial and error. I will use the word failure but more for dramatic purposes. In my view, my story is a story of an unsuccessful business venture, but it is also a story of redefining myself, looking back and learning.
My story
I am an English teacher. In 2007 I opened my own language school in Crete, Greece. I had been teaching English for quite a while. I had also spent many years developing professionally. I had an MA and I was working on getting more teacher qualifications. I had worked for other English langauge schools and my previous employers were happy with my performance. My students loved me. Taking the next step (opening a business to teach English as a foreign language) seemed natural, expected even. So, I did, with my sister. In 2014 when bills and tax just kept piling up and the number of students remained the same and too low, we closed the business.
I was so sad. While people did not say it to me, I could feel it. They felt sorry for me. I had failed as a business owner. Why me though? Wasn’t I good at teaching? Was I not a good teacher? A person? What did I not have? I spent months thinking about the things I could have changed. What would have happened if I had chosen X approach as opposed to Y? 7 years went down the drain…. or did they?
Guess what? Two years later, the sad days are over. Today, I am doing a job I love and I have learnt so much because of this experience.
I am strong(-er)
I put my heart, soul, and hours into something that did not work out. I went through mourning stages for a professional loss. There were days when I was doubting my capabilities, but today I am fine. My world did not end. The world ends only when you die. You can handle everything else.
I cannot control everything
Yes, you can control things that are tangible, in your surroundings, but you cannot control everything. How was I supposed to know that in 2008, Greece was going to be struck by the biggest financial crisis it has ever faced? The control freak in me was shattered.
Better sorry than safe
I took a personal, professional, and financial risk that failed, but if I hadn’t, I would always be wondering,” What if…” Now it’s not a ” what if” any more, it’s a been there, done that.
I am a fighter
I stuck to my guns for 7 years until it was time to let go.
I don’t like letting go
I am a workaholic. I love my work. My language school was my “baby”.I was hoping for better days. They did not come. Letting go is hard.
I take risks
There was a fifty-fifty chance of success. I didn’t succeed, but I did take a risk. I tried and then came error.
I am a dreamer
I wanted to start my own business. I really wanted to. My emotions got in the way of my critical thinking. Our wants are not always our needs. What we want may not always go the way we want it to. Just because I wanted something to succeed so badly, doesn’t mean it was going to.
I am not a girl boss
If you want to be a business woman, you got to take action when people/customers are not honoring your agreement. When someone does not pay, the service should be cut (In Greece you have to issue a receipt for a service even if you do not get paid that month. The government assumes that at some point you will get paid and that’s why you get taxed).
I am not a failure
Just because I failed, doesn’t mean I am a failure, and anyway, what is a failure? This could have been my “when one door closes, another one opens”. I learnt something about myself, my life, my priorities. So, instead of a failure, let’s call me a learner. At this point, I am more like, ” So your closed your language school? Eh! Big woop!”
Thanks for stopping by. Don’t forget to subscribe somehow cause if you don’t, you will miss out on all my fabulous posts :D!
After writing my first post on some of the online English for Academic Purposes resources I use and since my next pre sessional EAP course (6th!) is just around the corner, I thought it was time for round two. Time to write about some more online EAP resources I use/ will use. Some of these websites are solely geared towards EAP, but others can be used for general English as well.
Online EAP resources
Englishcentral
This website has a lot of videos which you can tell your students to watch as a self access study task. The videos focus on various elements and there are level descriptors. What I really like about this website is that on each video there are tabs. Watch/ Learn/ Speak. You can tell your learners to watch a video and then do the follow-up exercises. Some are gap filling tasks. After that they can practise as there is a recording button and the icing on the cake is that they get feedback on how they said the word. How great is that? I often send my learners to the Pronunciation courses. There is also an academic English course worth checking out (Academic courses).
Various corpora
True story: I was writing a blog post the other day and was a bit confused about which preposition should follow the word feedback, so I asked people on Facebook if the could suggest a website which would enable me to see words in use and the most common prepositions used after these words. I got lots of comments (Thank you everyone : )) and the two that I have been using ever since are just the word and the British national corpus.Getting your learners to use corpora is imperative as they often do not know how a word. Finding the right preposition is also another difficulty students may have. By using the corpora they will find examples of the words in sentences. Just the word has examples of correct and incorrect usage as well as a tab that shows how frequently a word followed by a preposition is used.
Baleap. org
Baleao is where I normally go to look for EAP jobs. It is also where you can find links to EAP related websites.There were two links that I didn’t know of. I checked them out and am now presenting them to you. The first one is the Prepare for Successwebsite. You can send your students to this website during the first week of the EAP course if this is held in the UK. There is a lot of information about p[preparing yourself and studying in the UK (videos/texts followed by tasks which provide feedback) which are useful for your international students ( mainly newcomers).
The other website that I found interesting is the Academic English Online website (Queen Mary University of London). This website has different tabs which focus on various EAP skills. I particularly liked the academic writing tab. You can press the academic tab and find other tabs with information about different features of academic writing. There are exercises which are also followed by feedback. Once again, your students can go to this website as part of a self access study task.
Edufind.com Here you can find an online grammar. There are clear tabs for grammatical phenomena. Your students can find rules followed by examples and sometimes even counter examples. The grammar is categorised by parts of speech. The icing on the cake is that after your learners check rules, they can practice the grammar by doing short exercises and/or a thorough test.
Resources on universities’ websites
These are websites that do not require signing in or registering. The resources are free. The University of Kent has free pdf files on all the academic skills. You can find information and mini lesson plans on listening, reading, writing, critical thinking and speaking. The writing development center on Newcastle University’s website.You can give this to your students for self-study. The university of Reading also has a website with lots of study tips for learners and information about punctuation, grammar and so on.
Mendeley
Your students can use Mendeley to reference and organise their Pdfs.
Good Presentation skills vs. Bad presentation skills videos
I very often use these two videos when I teach presentation skills.
Delivering a bad presentation: spot the mistakes
Delivering a good presentation: identify the good points.
Read my 1st post about EAP resourceshere. Subscribe to my blog if you like what I have to say. Connect with me on Pinterest/Instagram.Do you have any other favourites? Feel free to comment below!
Today I am going to show you a happy place on my desk and give you ideas on how to store your pens and all your stationery. I will also show you a few things on my amazon wish list and maybe inspire you (please keep in mind that I am using amazon affiliate links, so if you choose to buy something, I will get a small commission. You do not pay extra though). So, without further ado, here is how I keep my desk… a bit organised.
Mugs to keep your pens and pencils
I think mugs are so pretty and I have two in which I put pens and pencils. I am going through a stationery addiction at the moment and buying all these pretty little pens. I am trying to have more white and soft colours instead of black. I have a transparent glass mug with flowers and a white mug with zigzags. As I wanted it to be a bit more pretty I put some small flowers bouquets in the mugs.
Jewelry box
You know that nowadays you can find loads of jewelry boxes with draws. I got one with roses and polka dots. In the drawers I store little bits and bobs I need.
One drawer erasers, liquid paper, paper clips etc. I have another draw for chewies, pills I need to take everyday and a lighter. I have a drawer with hair ties, elastic bands etc, and my final drawer has all my usb sticks (FYI: I am an online teacher and well, a face to face teacher , so I need all this stuff lying around on my desk). I also have a few small notebooks next to the jewelery box/stationery organiser and of course my lovely Kawai erasers.
My wish list (amazon links)
Pretty mugs
Royal Albert China New Country Roses Cheeky Modern Mug, White/Pink . You can find it here.
Paperproducts Design Gold Rose 11-Ounce Porcelain Mug, Set of 2 . You can get this here. I like how this has 2 mugs and it comes with a case which you can use to store envelopes, bills, notebooks etc.
Jewelry box
Jewelry Accessories Box – Colorful Flowers With Drawers. You can get it here.
Cute pens
Rbenxia Gel Ink Roller Ball Pens Plastic Cartoon Pin Type Office Students Pen Pack of 10pcs You can get them here.
Amazon screenshot
Cute erasers
Sweet Treat Erasers Bakery 4 Pack . You can get them here.
Amazon screenshot
These are some of the things I like. You can go and check out similar things on Amazon, Etsy stores or your local stores.
Don’t forget to ‘pin’ this 😀
Subscribe to my blog if you like what I have to say. If you don’t, gimme another chance. Connect with me on Pinterest/Instagram.Maybe even give my Facebook page some TLC? Remember the comments section is all yours.
You know that I usually write a (thoughts) post when something upsetting has happened or I need advice or I want to ask your opinion or…. ( too many ors…. I know). Well, today isn’t one of those days. Today was freakin awesome! I had a great teaching day which just reminded me of why I ❤ my job. So, here is my ode to the ‘awesomeness’ of teaching!!
FUN factor
As teachers, we often make lessons that are learner-centered and that aim to help the learners of course, learn something. We also try to please or even entertain them. But what about the teacher? How often do you make/have lessons that you the teacher will enjoy? One minute… one minute… before you start rolling your eyes, jumping up and saying, “I always make lessons that interest me too!I cannot teach something if I find it boring!” I know that. I agree on that. I am talking about lessons YOU enjoy, not because your learners are having fun, but because YOU are having fun! In the learner-centered classroom, how often does the teacher pull the short straw? Today, I had a very interesting lesson with my learner and we were both having real fun. We were both laughing, he was asking questions, I was answering. I was asking questions, he was answering. He got the target language, he used the target language. It was a great lesson. It was AWESOME.
Teacher praise
I then had a different lesson. One with an A2 learner who struggles, but was able to make a complex sentence with a few errors in it.He got out of his comfort zone and tried it instead of lots of little sentences, he made a complex one. When I got feedback from the learner, he said, ” I feel more comfortable Joanna, and I am making longer sentences and I want to thank you for that”. Awwwwwww. I mean, I don’t know how often your students say, ” Thank you”, some of mine do, usually when they go off into the real world, but during a course, during a lesson, they don’t really say any thanks. But today one did, and that was AWESOME too!!!
So, yeah…. today was awesome, and I am sharing it with you, cause you guys are awesome too, cause you do the same thing as me. We are awesome teachers!!! What makes a teacher happy doesn’t necessariyly have to do with money. We get good vibes, praises and that makes us happy.
Toot- toot- toot ( Joanna praising herself and using the third person).
Whoever counts how many times I used the word awesome gets a cookie!!!!! Oh!!! Please, please, if you have time, leave a comment below about an awesome teaching moment for you. Let’s spread the…. awesomeness!!!! ❤ ❤